 |
 |
 |
 |
 |
 |
 |
 |
 |
 | 
| |||||||||||||||||||||||||||||||||||||||||||||||||||||||||||
|
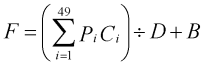
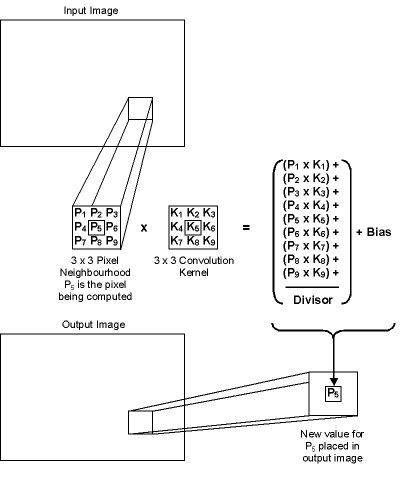
The Convolution effect is similar to the 'User Defined Filters' available in such graphic applications as JASC's 'Paint Shop Pro' and Adobe's 'Photoshop'. This effect is used to filter an image by replacing each pixel in the source image with the weighted sum of the pixels in the neighbourhood surrounding the pixel. The neighbourhood weightings define the convolution. For colour images, each colour channel is processed independently. The formula for this calculation is:
Where F is the filtered value of the target pixel, P is a pixel in the grid, C is a coefficient in the matrix, D is the Divisor and B is the Bias. The default filter is an identity matrix, which has no effect on the underlying image.
In a convolution filter, a convolution kernel is defined, usually as a 3x3, 5x5 or 7x7 matrix. The entries (positive or negative integers) in the matrix are the weights given to the pixels that surround the centre pixel (which corresponds to the centre matrix element). Basically, for a particular pixel, the surrounding pixels are multiplied by the corresponding coefficient in the convolution kernel and summed together. This summation is divided by the 'Divisor' and the 'Bias' value is then added. This is the value given to the corresponding filtered pixel. This is repeated for every pixel in the image:
As a general rule, if the 'Sum' is positive, the 'Bias' is 0. If the 'Sum' is negative, the 'Bias' is set to 255 (for inverting) and if the 'Sum' is 0, the 'Bias' is 128 (for embossing). The Convolution plugin comes with a number of presets as examples but the best results are found through experimentation with different combinations of matrix, divisor, bias and channels. Do remember that the larger the kernel, the longer the calculations will take. | ||||||||||||||||||||||||||||||||||||||||||||||||||||||||||||